Pages

September 29, 2008

Smoked Mackerel Toasts


I discovered Nigel Slater about a year ago. I read his memoir Toast for the "Novel Cuisine" class (part book club, part cooking class) at Kitchen Conservatory, and I was instantly smitten. I immediately purchased his latest book The Kitchen Diaries. It's a year of his journals about what he's cooked, eaten, purchased, and grown. It's an absolutely gorgeous book, with vivid pictures that make me want to lick the pages.

One of the pages I've had marked for a while features a recipe for "smoked mackerel on toast." I wanted to try it a while ago, but I couldn't find smoked mackerel in any of my local supermarkets. On Saturday, I spotted a package of the smokey fish at Whole Foods and decided to make that for dinner tonight.

The finished product yields a very flavorful, crispy toast that goes very well with a glass of wine.

Smoked Mackerel on Toast
from Nigel Slater's The Kitchen Diaries

1/2 pound smoked mackerel
3 generous tablespoons, plus a little more, heavy cream
3 generous tablespoons, plus a little more, grated parmesan cheese
6 chives, chopped
8 slices of sourdough (or whatever bread you have on hand)
freshly grated black pepper
  • Remove the skin from the mackerel, put the flesh in a bowl, and flake it lightly with a fork.
  • Stir in the 3 tablespoons of cream and 3 tablespoons of cheese.
  • Add the chives and a few cranks of black pepper.
  • Toast the bread under the broiler lightly on both sides, turning once to toast both sides.
  • Pile a heaping tablespoon of the mackerel mixture on each hot toast. Drizzle with a very little cream and top with a bit more of the cheese.
  • Broil for 3 or 4 minutes, rotating if necessary, until golden and bubbling.

September 26, 2008

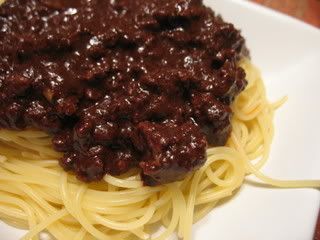
Cincinnati Chili

Even though Monday was the first day of fall, weather here is in the mid-80s. And, that's just not right. In an effort to seduce the autumn gods, I made some Cincinnati chili for dinner earlier this week.

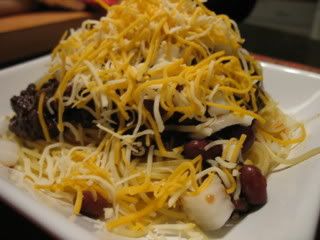
Cincinnati chili is a mixture of ground beef, onions, garlic, tomato sauce, broth, seasonings, and spices...including chili powder, chipotle pepper, cumin, allspice, cinnamon, and unsweetened cocoa. It's simmered until thick and fragrant, then served over spaghetti with kidney beans, diced onion, and shredded cheese (that's called a "five-way").

I've actually eaten Cincinnati chili at Skyline, the chain most famous for this regional recipe. And, I have to say...and I don't mean to brag...this is so much better!

Photobucket

Cincinnati Chili
slightly adapted from The Kitchn
serves 2-4
1 pound ground beef
1 onion, minced
4 garlic cloves, minced
1/2 teaspoon red pepper flakes
2 tablespoons chili powder
3 tablespoons natural unsweetened cocoa
2 teaspoons ground cinnamon
1 teaspoon ground allspice
1 teaspoon ground cumin
1 chipotle pepper in adobe, diced
1 teaspoon salt
2 bay leaves
1 tablespoon Worcestershire sauce
1 tablespoon cider vinegar
15-ounces tomato sauce
1 cup chicken or beef broth
1/2 cup water
Heat a large, heavy frying pan with a tablespoon or so of olive oil over medium high heat and when hot add the beef, minced onion and garlic, and chili powder. Sprinkle in the red pepper flakes. Cook for about eight minutes or until the meat is browned.
In a separate bowl combine the cocoa, cinnamon, allspice, cumin, and salt. Add to the meat and stir fry for another couple minutes until fragrant.
Add the bay leaves, chipotle pepper, Worcestershire, vinegar, tomato sauce, broth and water. Turn heat to low and simmer for an hour, or until thickened.
Serve over spaghetti with minced onion, hot kidney beans, and cheddar cheese.
Photobucket

September 23, 2008

Tuesdays with Dorie: Dimply Plum Cake

I know, I know...I haven't done too many Tuesdays with Dorie recipes lately. It was, quite frankly, cookie overload there for a few weeks. I was excited to see that this week's recipe, chosen by Michelle of Bake-en, was for Dimply Plum Cake.

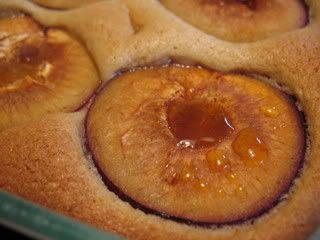
Basically, this recipes involves making a cardamom/orange zest/brown sugar batter that's poured into a square pan then topped with pitted plum halves.

Photobucket

As it bakes, the cake puffs up around the plums. The fruit caramelizes and turns jammy. It sounds and looks quite delicious.

Photobucket

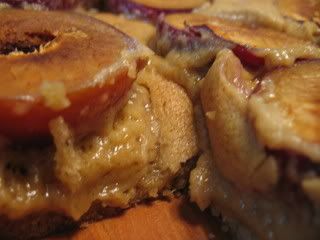
The recipe calls for baking the 8-inch square cake at 350 for 40 minutes. At 40 min, my cake was still "wet" in the middle, so I let it bake 10 more minutes. The top was very brown, almost too brown, but the middle still seemed too wet. Nevertheless, I took the cake out of the oven.

Photobucket

I wondered what went wrong...were the plums too juicy? Was my oven temperature off (yes, I do have a thermometer in there!)? Should I have used the recommended cookie sheet under the pan?

Most of Dorie's cake recipes call for baking the pans on cookie sheets. I've never done this. I posted a question on the TWD website about the purpose of the sheets. One person suggested that the cookie sheets help cakes bake evening. Someone else said that the sheets are simply to help move the pan around. Anne, the owner of Kitchen Conservatory, also said the cookies sheets are for ease in getting the cakes in & out of the oven. She said it doesn't assure even baking.

Even though the cake didn't turn out perfectly, it still tasted good! I am looking forward to trying this recipe again, next time with one of Dorie's "playing around" suggestions...like peaches with lemon & basil or cherries with lime.

September 20, 2008

I'm still here!

My poor blog, I feel like I've been neglecting you. It's not that I haven't been cooking. I just haven't had time to write posts.

This new teaching job is eating up all my free time. I've been staying at school until 5 or 6 each night, then doing more planning at home. Plus, I'm still working weekends at Kitchen Conservatory. I'm exhausted.

Still, I am actually enjoying my new job. It's a lot of work, but it's pretty fun. For the most part, I like my students. They are good kids. And, I've been impressed by their work. I had my European Literature class write a "This I Believe" essay in the voice of a character from Beowulf. The content of their essay had to reflect the character's personality, and their writing had to reflect the language of the poem. They blew me away with what they wrote. Really amazing stuff!

Yesterday, I arrived at school at 6:00 in the morning for a pep rally that was being broadcast on the local news. Check it out! Like I said...good kids.

Anyway, I bought a butternut squash at the local farmers' market recently and used it to make butternut squash macaroni & cheese, a recipe I found on A Veggie Venture and have had bookmarked since last year. The squash adds just a hint of sweetness to the pasta; it's so good I was even eating if for breakfast (with a sunny-side up egg on top!).

I also made an apple-caramel flip with the first Jonathans of the year. I simply rolled some pie dough out into a circle, coated half with graham cracker crumbs, topped with peeled & sliced apples, added caramel bits, dusted with cinnamon, dotted with butter, & folded the crust over, brushed it with egg wash, sprinkled with sugar, then baked until golden brown. Yum!


Today, I'm making a plum cake (check back on Tuesday for the recipe) & I'm seriously considering a souffle for lunch. Hopefully, now that I've been teaching at the new school for 6 weeks (I can hardly believe it's been that long already!), I have a handle on the planning and scheduling and can focus more time at home on cooking and blogging. It is, after all, my favorite season (food, weather, and otherwise) of the year!

September 10, 2008

Bacon Cookies with Maple Icing & Candied Bacon

The bacon class I am teaching on Sunday is a go (it's not too late to sign up)! So, this week I've been doing final recipe testing, which included a dessert.

A couple friends came over to sample the cookies that night, and I took the rest to school where a few students and teachers tried the cookies. Everyone seemed to like them.

So, what do they taste like? The cookies themselves are similar to shortbread, not very sweet and kind of crumbly; I think the icing is essential. The bacon isn't very prominent either. They are, instead, reminiscent of a pancake and bacon breakfast...really good with morning coffee!

Bacon Cookies
adapted from The Bacon Cookbook

4 slices thick cut, lean bacon, finely chopped
2 cups all-purpose flour
8 tablespoons butter (1 stick), cut into pieces & softened
1 large egg
3 tablespoons heavy cream
  • Fry the bacon over medium heat until crisp and drain on paper towels.
  • In a mixing bowl, combine the flour, butter, egg, and cream & mix until well-blended.
  • Add the bacon and knead until the dough is soft and the bacon is evenly distributed, about 1 minute.
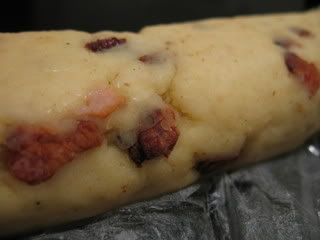
  • Roll the dough into one or two logs about 1 1/2 inches thick. Wrap in plastic wrap and chill until firm, at least 2 hours.
Photobucket Image Hosting
  • Preheat the oven to 350 degrees Fahrenheit.
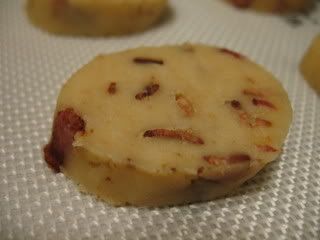
  • Cut the dough into 1/4-inch thick slices & arrange the slices about 1 inch apart on a lightly greased cookie sheet (use a bit of the bacon grease or use a silicone mat).
Photobucket Image Hosting
  • Bake until the cookies are firm and very lightly browned (they won't get golden brown), about 12-15 minutes.
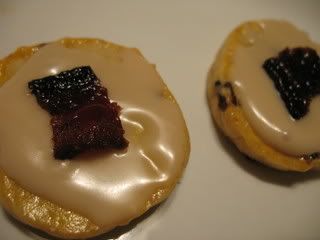
  • Transfer the cookies to a rack to cool. Then, spread with maple icing and top with a small piece of candied bacon (recipes below).
Photobucket Image Hosting

Maple Icing

You don't really need a precise recipe for these. For the icing, I mixed some powdered sugar (let's say about a 1/2 cup) with some Grade A real maple syrup (let's say 3 tablespoons). But really, I didn't measure. I eyeballed it...adding a bit more sugar, then a bit more syrup until I got the right consistency. You want it to be thick enough to spread...unless you want it think enough to pour. It's really up to you. But, you MUST use the good syrup here, NOT the maple-flavored stuff. Ice the cookies when they are cool.

Candied Bacon, aka Pig Candy (optional)

The candied bacon is just as easy. Lay several slices of maple bacon on a cookie sheet. Be sure to line the sheet with a silicone mat or use a sheet with a baking rack on top. Coat each bacon slice with light brown sugar. Bake in the oven until the bacon is crisp, about 25 minutes. I cooked the bacon with the cookies and just kept checking it. The bacon will turn a deep mahogany color; don't be alarmed. When it's done, let it cool on the rack with the cookies. Then, cut it into small piece to put on top of the cookies.

September 9, 2008

Tuesdays with Dorie: Chocolate Malted Whopper Drops


The Tuesdays with Dorie group is on a cookie kick lately...and this week's recipe was chosen by Rachel of Confessions of a Tangerine Tart.

I had been promising my college English classes that I would bring them a treat, so I made these cookies for them.

"Did you make these yourself," one girl asked.

"Of course," I replied.

"Wow. I've never had a teacher actually make something for a class."

I've been trying to keep them on their toes. Heehee.

Actually, though, I've only revealed little bits about myself since school started a few weeks ago. I wore long pants the first day and a skirt the second day, revealing the white daisy tattoo on my ankle. I got a lot of "you have a tattoo?" that day. When we were doing descriptive exercises, I said something about seeing Rob Zombie perform live.

"You've been to a Rob Zombie concert?" one kid asked.

"I've been to two." I said. They looked confused. "Oh, I forgot to tell you," I explained. "I'm hardcore."

Later that period, I was talking about food descriptions and I told them to avoid words like delicious and tasty, because they are too subjective. What's delicious to me might not be delicious to them.

"For example, I think caviar and raw oysters are really delicious." I said.

"Ewww!"

"Wait," one boy interrupted, "You eat caviar and raw oysters?"

"Sure. In fact, I had caviar and champagne for dinner just last night."

His response: "Who are you?"

"We've already been over this," I replied. "Hard. core."

Anyway...

These cookies are hardcore chocolatey, but since I used regular malted milk powder (not chocolate-flavored), they weren't too chocolatey. And the Whopper bits sort of melt and caramelize into the chewy cookie. Really yum.

September 6, 2008

September 1, 2008

Daring Bakers: Chocolate (and Ginger) Eclairs


Ok, I admit it...I've been a not-so-daring baker. Since joining the Daring Bakers group in March, I've missed two months...both cakes. I just wasn't into the cakes. *sigh*

However, I was excited to see that this month's recipe, chosen by Meeta and Tony, was for chocolate eclairs. I've never made eclairs, so this would give me a chance to try my hand at pate a choux dough and pastry cream.

But then...

I got that new teaching job a few weeks before school started, and I was frantically trying to get my classroom ready and figure out what the heck I was supposed to be teaching.

Still, I remembered the August DB challenge in the back of my mind and looked forward to a day off so I could make those chocolate eclairs.

And then yesterday, I realized that August 31 was the posting day. And I hadn't made the eclairs yet! I thought for sure that I would do them yesterday. I had planned on it.

But then...

I had to bake that apple tart tatin because the farmers' market apples were expiring on the counter. I didn't feel much like baking eclairs after that...and after cleaning, doing laundry, and making a webpage for my classes.

Today, in between more cleaning, more laundry, and more lesson planning, I've managed to make those @#$% eclairs! No, really, I did enjoy it. Such a feeling of accomplishment...

There is, of course, an advantage to waiting until the last minute...seeing what everyone else has done! And learning from their mistakes.

The rules this month were simple: We had to use the choux dough as follows and keep one of the chocolate elements (either the chocolate pastry cream or the chocolate glaze.)

I chose to keep the glaze (which was time-consuming & sort of redundant), while making a ginger pastry cream.

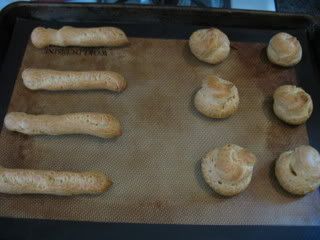
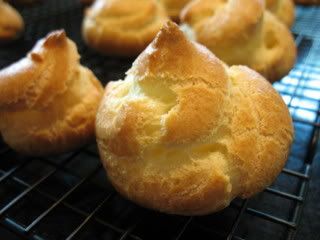
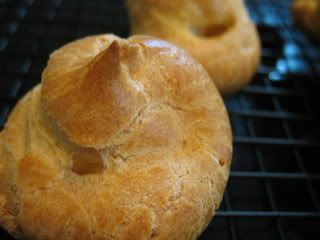
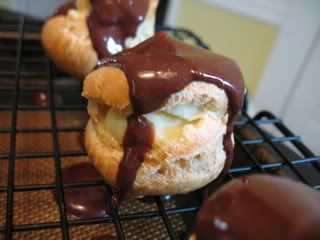
For the first batch of eclairs, I piped some strips to form the traditional "long johns" and some spiraly circles. The strips didn't puff up enough to become finished eclairs (they looked like fingers), but the circles came out nicely.

Photobucket

I did all larger circles for the second batch, and I thought they turned out the best.

Photobucket

Also, several people wrote about how their shells fell after taken out of the oven. The remedy, it seems, is to bake them longer than the 20-minutes as the recipe says. I baked mine 10 minutes longer, checking after 5 minutes to make sure the bottoms weren't burning.

Photobucket

Chocolate & Ginger Eclairs

(makes 20-24 eclairs)

I prepared the cream first, to give it time to chill while I baked the eclair shells. As the shells were cooling, I made the chocolate glaze.

Ginger Pastry Cream
adapted from Dorie Greenspan's Baking: From My Home to Yours

2 cups whole milk
2 heaping tablespoons candied ginger, finely chopped
6 large egg yolks
1/2 cup sugar
1/3 cup cornstarch, sifted
1 1/2 teaspoons vanilla extract
3 1/2 tablespoons unsalted butter, cut into bits, at room temperature
  • Bring the milk and ginger to a boil in a small saucepan.
  • Meanwhile, in a medium heavy-bottomed saucepan, whisk the yolks together with the sugar and cornstarch until thick and well-blended.
  • While whisking, drizzle about 1/4 cup of the hot milk into the yolks to temper them.
  • Whisking all the while, slowly pour in the remainder of the milk.
  • Put the pan over medium-low heat and, whisking vigorously & constantly & thoroughly, bring the mixture to a boil.
  • Keep boiling & whisking for 1-2 minutes, then remove the pan from the heat.
  • Whisk in the vanilla.
  • Then, whisk in the butter, stirring until they are fully incorporated and the cream is smooth & silky.
  • Transfer the pastry cream to a small bowl. Press a piece of plastic wrap against the surface and refrigerate until ready to use.
Notes:
  1. The pastry cream can be made 2‐3 days in advance and stored in the refrigerator.

Choux (aka Cream Puff) Dough
recipe from Chocolate Desserts by Pierre Herme

½ cup whole milk
½ cup water
1 stick unsalted butter, cut into 8 pieces
¼ teaspoon sugar
¼ teaspoon salt
1 cup all-purpose flour
5 large eggs, at room temperature
  • In a heavy bottomed medium saucepan, bring the milk, water, butter, sugar and salt to a boil.
  • Once the mixture is at a rolling boil, add all of the flour at once, reduce the heat to medium and start to stir the mixture vigorously with a wooden spoon. The dough comes together very quickly. Do not worry if a slight crust forms at the bottom of the pan, it’s supposed to. You need to carry on stirring for a further 2-3 minutes to dry the dough. After this time the dough will be very soft and smooth.
  • Transfer the dough into a bowl of a mixer fitted with the paddle attachment, or using your handmixer or if you still have the energy, continue by hand. Add the eggs one at a time, beating after each egg has been added to incorporate it into the dough. You will notice that after you have added the first egg, the dough will separate, once again do not worry. As you keep working the dough, it will come back all together again by the time you have added the third egg. In the end the dough should be thick and shiny and when lifted it should fall back into the bowl in a ribbon. (Mine was actually very thick, no ribbons here. I wonder why...)
  • The dough should be still warm. It is now ready to be used for the éclairs.
  • Preheat your oven to 375 degrees F. Divide the oven into thirds by positioning the racks in the upper and lower half of the oven. Line two baking sheets with waxed paper, parchment paper, or silicone baking mats.
  • Fill a large pastry bag fitted with a 2/3 plain tip nozzle with the warm cream puff dough. Pipe the dough onto the baking sheets in long, 4 to 41/2 inches chubby fingers. Leave about 2 inches space in between each dough strip to allow them room to puff. The dough should give you enough to pipe 20-24 éclairs.
  • Slide both the baking sheets into the oven and bake for 7 minutes. After the 7 minutes, slip the handle of a wooden spoon into the door to keep in ajar. When the éclairs have been in the oven for a total of 12 minutes, rotate the sheets top to bottom and front to back. Continue baking for a further 8 minutes or until the éclairs are puffed, golden and firm. The total baking time should be approximately 20 minutes. (But really, you need to bake them 10-15 minutes more.)
  • Remove the shells from the oven and transfer to a cooling rack.
Notes:
  1. Once the dough is made you need to shape it immediately.
  2. You can pipe the dough and the freeze it. Simply pipe the dough onto parchment-lined baking sheets and slide the sheets into the freezer. Once the dough is completely frozen, transfer the piped shapes into freezer bags. They can be kept in the freezer for up to a month.
  3. The éclairs can be kept in a cool, dry place for several hours before filling.
Photobucket

Chocolate Glaze
recipe from Chocolate Desserts by Pierre Herme
(makes 1 cup)

1/3 cup heavy cream
3½ oz bittersweet chocolate, finely chopped
4 teaspoons unsalted butter, cut into 4 pieces, at room temperature
7 tablespoons Chocolate Sauce (recipe below), warm or at room temperature
  • In a small saucepan, bring the heavy cream to a boil. Remove from the heat and slowly begin to add the chocolate, stirring with a wooden spoon or spatula.
  • Stirring gently, stir in the butter, piece by piece followed by the chocolate sauce.
Notes:
  1. If the chocolate glaze is too cool (i.e. not liquid enough) you may heat it briefly in the microwave or over a double boiler.
  2. It is best to glaze the eclairs after the glaze is made, but if you are pressed for time, you can make the glaze a couple days ahead of time, store it in the fridge and bring it up to the proper temperature (95 to 104 F) when ready to glaze.

Chocolate Sauce
(makes 1½ cups)

4½ oz bittersweet chocolate, finely chopped
1 cup water
½ cup crème fraîche or heavy cream
1/3 cup sugar
  • Place all the ingredients into a heavy‐bottomed saucepan and bring to a boil, making sure to stir constantly. Then reduce the heat to low and continue stirring with a wooden spoon until the sauce thickens.
  • It may take 10‐15 minutes for the sauce to thicken, but you will know when it is done when it coats the back of your spoon.
Notes:
  1. You can make this sauce ahead of time and store it in the refrigerator for two weeks. Reheat the sauce in a microwave oven or a double boiler before using.
  2. This sauce is also great for cakes, ice-cream and tarts.

Assembling the éclairs:
  • Slice the éclairs horizontally, using a serrated knife and a gently sawing motion. Set aside the bottoms and place the tops on a rack over a piece of parchment paper.
Photobucket
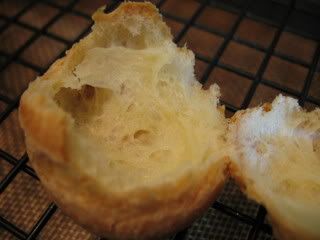
The puffs are hollow in the middle, so I just used my fingers to gently nudge the top apart on the circles.
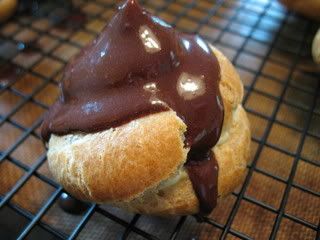
  • The glaze should be barely warm to the touch (between 95 – 104 degrees F, as measured on an instant read thermometer). Spread the glaze over the tops of the éclairs using a metal icing spatula. Allow the tops to set and in the meantime fill the bottoms with the pastry cream.
  • Pipe or spoon the pastry cream into the bottoms of the éclairs. Make sure you fill the bottoms with enough cream to mound above the pastry. Place the glazed tops onto the pastry cream and wriggle gently to settle them.
Notes:
  1. If you have chilled your chocolate glaze, reheat by placing it in a bowl over simmering water, stirring it gently with a wooden spoon. Do not stir too vigorously as you do not want to create bubbles.
  2. The éclairs should be served as soon as they have been filled.
Photobucket