 Kelly of Sass & Veracity and Ben of What's cooking? chose this month's Daring Bakers recipe.
I just love how things worked out for me this month. I learned to make croissants last weekend, and this dough is also a laminated dough (one which is layered with butter, then folded and rolled out several times). So, I felt confident to try this at home.
I made a whole batch of dough, but used half to make croissants for breakfast. The other half became the danish braid, which I filled with fresh sour cherries that I bought at the farmers market yesterday.DANISH BRAID
Ingredients
1 recipe Danish Dough (see below)
2 cups fruit filling, jam or preserves (see below)
For the egg wash: 1 large egg, plus 1 large egg yolk

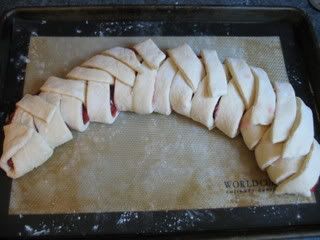
I didn't really pay close attention to the size and number of "flaps" I cut on the braid, and so it was thicker on one end.
DANISH DOUGH
Makes enough for 2 large braids
Ingredients
1 recipe Danish Dough (see below)
2 cups fruit filling, jam or preserves (see below)
For the egg wash: 1 large egg, plus 1 large egg yolk
- Line a baking sheet with a silicone mat or parchment paper. On a lightly floured surface, roll the Danish Dough into a 15 x 20-inch rectangle, ¼ inch thick. If the dough seems elastic and shrinks back when rolled, let it rest for a few minutes, then roll again. Place the dough on the baking sheet.
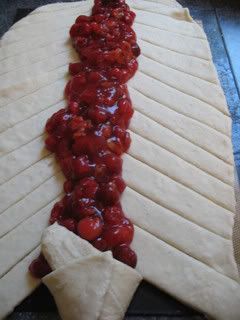
- Along one long side of the pastry make parallel, 5-inch-long cuts with a knife or rolling pastry wheel, each about 1 inch apart. Repeat on the opposite side, making sure to line up the cuts with those you’ve already made.
- Spoon the filling you’ve chosen to fill your braid down the center of the rectangle. Starting with the top and bottom “flaps”, fold the top flap down over the filling to cover. Next, fold the bottom “flap” up to cover filling. This helps keep the braid neat and helps to hold in the filling. Now begin folding the cut side strips of dough over the filling, alternating first left, then right, left, right, until finished. Trim any excess dough and tuck in the ends.

I didn't really pay close attention to the size and number of "flaps" I cut on the braid, and so it was thicker on one end.
- For the Egg Wash: Whisk together the whole egg and yolk in a bowl and with a pastry brush, lightly coat the braid.
- Spray cooking oil (Pam…) onto a piece of plastic wrap, and place over the braid. Proof at room temperature or, if possible, in a controlled 90 degree F environment for about 2 hours, or until doubled in volume and light to the touch.
- Near the end of proofing, preheat oven to 400 degrees F. Position a rack in the center of the oven.
- Bake for 10 minutes, then rotate the pan so that the side of the braid previously in the back of the oven is now in the front. Lower the oven temperature to 350 degrees F, and bake about 15-20 minutes more, or until golden brown.
- Cool and serve the braid either still warm from the oven or at room temperature. The cooled braid can be wrapped airtight and stored in the refrigerator for up to 2 days, or freeze for 1 month.
DANISH DOUGH
Makes 2-1/2 pounds dough (enough for two braids)
Ingredients
For the dough:
1 ounce fresh yeast or 1 tablespoon active dry yeast
1/2 cup whole milk
1/3 cup sugar
Zest of 1 orange, finely grated
3/4 teaspoon ground cardamom
1-1/2 teaspoons vanilla extract
1/2 vanilla bean, split and scraped
2 large eggs, chilled
1/4 cup fresh orange juice
3-1/4 cups all-purpose flour
1 teaspoon salt
For the butter block:
1/2 pound (2 sticks) cold unsalted butter
1/4 cup all-purpose flour
Dough
- Combine yeast and milk in the bowl of a mixer fitted with the paddle attachment and mix on low speed. Slowly add sugar, orange zest, cardamom, vanilla extract, vanilla seeds, eggs, and orange juice. Mix well. Change to the dough hook and add the salt with the flour, 1 cup at a time, increasing speed to medium as the flour is incorporated. Knead the dough for about 5 minutes, or until smooth. You may need to add a little more flour if it is sticky. Transfer dough to a lightly floured baking sheet and cover with plastic wrap. Refrigerate for 30 minutes.
- Without a standing mixer: Combine yeast and milk in a bowl with a hand mixer on low speed or a whisk. Add sugar, orange zest, cardamom, vanilla extract, vanilla seeds, eggs, and orange juice and mix well. Sift flour and salt on your working surface and make a fountain. Make sure that the “walls” of your fountain are thick and even. Pour the liquid in the middle of the fountain. With your fingertips, mix the liquid and the flour starting from the middle of the fountain, slowly working towards the edges. When the ingredients have been incorporated start kneading the dough with the heel of your hands until it becomes smooth and easy to work with, around 5 to 7 minutes. You might need to add more flour if the dough is sticky.
- Combine butter and flour in the bowl of a mixer fitted with a paddle attachment and beat on medium speed for 1 minute. Scrape down the sides of the bowl and the paddle and then beat for 1 minute more, or until smooth and lump free. Set aside at room temperature.
- After the detrempe has chilled 30 minutes, turn it out onto a lightly floured surface. Roll the dough into a rectangle approximately 18 x 13 inches and ¼ inch thick. The dough may be sticky, so keep dusting it lightly with flour. Spread the butter evenly over the center and right thirds of the dough. Fold the left edge of the detrempe to the right, covering half of the butter. Fold the right third of the rectangle over the center third. The first turn has now been completed. Mark the dough by poking it with your finger to keep track of your turns, or use a sticky and keep a tally. Place the dough on a baking sheet, wrap it in plastic wrap, and refrigerate for 30 minutes.
- Place the dough lengthwise on a floured work surface. The open ends should be to your right and left. Roll the dough into another approximately 13 x 18 inch, ¼-inch-thick rectangle. Again, fold the left third of the rectangle over the center third and the right third over the center third. No additional butter will be added as it is already in the dough. The second turn has now been completed. Refrigerate the dough for 30 minutes.
- Roll out, turn, and refrigerate the dough two more times, for a total of four single turns. Make sure you are keeping track of your turns. Refrigerate the dough after the final turn for at least 5 hours or overnight. The Danish dough is now ready to be used. If you will not be using the dough within 24 hours, freeze it. To do this, roll the dough out to about 1 inch in thickness, wrap tightly in plastic wrap, and freeze. Defrost the dough slowly in the refrigerator for easiest handling. Danish dough will keep in the freezer for up to 1 month.
SOUR CHERRY FILLING

I have so many cherries! Look for more recipes here soon!
Makes enough for two braids

I have so many cherries! Look for more recipes here soon!
Makes enough for two braids
Ingredients
2 pounds of fresh sour cherries, pitted
1/2 cup sugar
1 tsp. ground cinnamon
2 tablespoons corn starch
1/2 cup water (or more if needed)
Toss all ingredients in a small saucepan. Bring to a boil over medium heat, then lower heat and simmer 2 minutes or until thickened. Thin with a bit more water if needed. Transfer to a bowl and let cool to room temperature.
I also topped each piece of the braid with a thin glaze of powdered sugar and milk.


Congratulations! The sour cherries look awesome!
ReplyDeleteI LOVE the sour cherry idea! The braid looks delectable!
ReplyDeleteLooks quite tempting. After all, the proof is in the eating.:)
ReplyDeleteYou cherry filling sounds divine!
ReplyDeleteI love your cherry filling. I've assembled and/or baked many things that had to be curved or in some other way distorted to fit on all my tiny things. :) It looks awesome.
ReplyDeleteThe cherry filling looks divine! I love how the one cherry is peeking out of the cut slice - what a flirt!! Great job!
ReplyDeleteYour cherries look fantastic. Now if I only had a cherry tree, as cherries are usually $9 per pound. Thanks for the recipe, as someday cherries might not be so expensive.
ReplyDeleteThe sour cherry filling sounds so yummy!
ReplyDeleteLove the sour cherry filling! Well done on your challenge this month.
ReplyDeleteI'm so jealous that you can find sour cherries in your neck of the woods! Your braid looks beautiful! How did your croissants turn out?
ReplyDeleteFresh sour cherries. Simple... and sensational! Great job Kelly!
ReplyDeleteYour braid looks so yummy! Can I have a bite!?! Your cherry filling sounds scrumptious.
ReplyDelete